

Now we will use Remote Authentication Dial In User Service (RADIUS) instead. Again we will authenticate our users against Active Directory, as domain user accounts.
For that purpose we need to add Network Policy and Access Services server role to our Windows Server 2008 R2.

From the Role services select only the Network Policy Server. We don’t need any of the other services.

After the successful installation, open the Network Policy Server console. Under RADIUS Clients and Servers, create new RADIUS Client.
 Take note of the Friendly name of the client, we will use is later in the Network Policy. In our case pfSense.
Enter the LAN address of pfSense, and Shared secret.

Leave the default configuration on the Advanced leaf.

We won’t configure additional Connection request Polies.

A new Network Policy is needed, because the default Connections to other access servers block requests send by pfSense.

Enter Policy name of your preference, and leave the default Type of network access server to Unspecified. Otherwise your authentication request will be denied.
 For Condition, let’s add the Client Friendly Name. In our case the client is our pfSense router. Type in here the Friendly name that you used in the RADIUS Client configuration. In our case pfSense.

On Specify Access Permission, leave Access granted.

As Authentication Methods add Unencrypted authentication (PAP, SPAP). The explanation follows later.
 Leave constraints to defaults, if you don’t have some specific requirements. The same is valid for Settings too.


All done


On your pfSense go to System > User Management > Servers add new.

Enter descriptive name of your liking. As type select Radius. Enter the IP address of the server that we just configure to be our RADIUS server. Under Services offered, leave the default Authentication and Accounting. Take note that we have not configured accounting on our NPS service, but you could easily enable it. The default ports are fine. If you have Windows Firewall, or some other kind of firewall service running, make sure required ports are open.

It is time to go to your OpenVPN Server configuration and select our new RADIUS provider as Backend for authentication.

Now if you make test connection with test user, take a look at the security logs on the RADIUS server.
You will see RADIUS Client Friendly Name match out configuration, and which Policies were used, and that the Authentication Type is PAP, that is why we added it to the policy earlier.
That’s it.
For that purpose we need to add Network Policy and Access Services server role to our Windows Server 2008 R2.

From the Role services select only the Network Policy Server. We don’t need any of the other services.

After the successful installation, open the Network Policy Server console. Under RADIUS Clients and Servers, create new RADIUS Client.
 Take note of the Friendly name of the client, we will use is later in the Network Policy. In our case pfSense.
Enter the LAN address of pfSense, and Shared secret.

Leave the default configuration on the Advanced leaf.

We won’t configure additional Connection request Polies.

A new Network Policy is needed, because the default Connections to other access servers block requests send by pfSense.

Enter Policy name of your preference, and leave the default Type of network access server to Unspecified. Otherwise your authentication request will be denied.
 For Condition, let’s add the Client Friendly Name. In our case the client is our pfSense router. Type in here the Friendly name that you used in the RADIUS Client configuration. In our case pfSense.
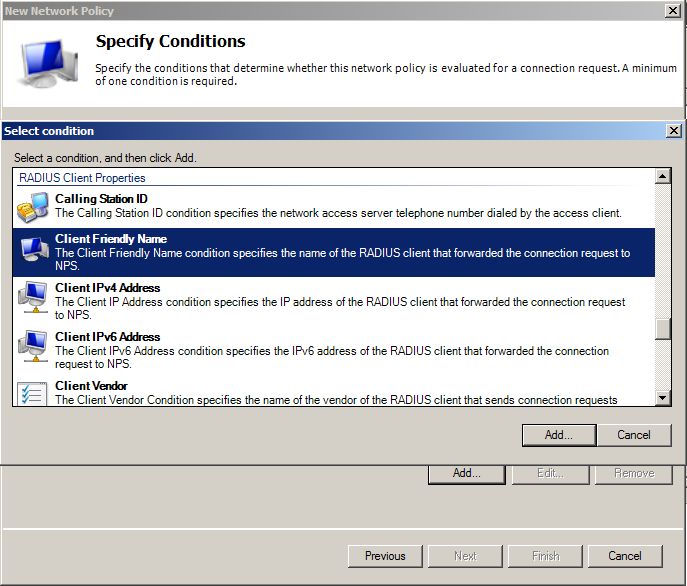

On Specify Access Permission, leave Access granted.

As Authentication Methods add Unencrypted authentication (PAP, SPAP). The explanation follows later.
 Leave constraints to defaults, if you don’t have some specific requirements. The same is valid for Settings too.

All done


On your pfSense go to System > User Management > Servers add new.

Enter descriptive name of your liking. As type select Radius. Enter the IP address of the server that we just configure to be our RADIUS server. Under Services offered, leave the default Authentication and Accounting. Take note that we have not configured accounting on our NPS service, but you could easily enable it. The default ports are fine. If you have Windows Firewall, or some other kind of firewall service running, make sure required ports are open.

It is time to go to your OpenVPN Server configuration and select our new RADIUS provider as Backend for authentication.

Now if you make test connection with test user, take a look at the security logs on the RADIUS server.
You will see RADIUS Client Friendly Name match out configuration, and which Policies were used,
 and that the Authentication Type is PAP, that is why we added it to the policy earlier.
That’s it.
0 comments:
Post a Comment